[wordpress插件] Advanced Category and Custom Taxonomy Image高级类别和自定义分类图像

wordpress 插件 文章 2020-02-06 21:00 570 0 全屏看文

AI助手支持GPT4.0

评分

100

100

描述

Now its easier to include category / custom taxonomy image with this plugin for different platforms.

现在,此插件可轻松在不同平台上包含类别/自定义分类图像。

No need to overload mobile bandwidth with high pixel image size.

高像素图像尺寸无需超载移动带宽。

You can now select different image for different devices.

现在,您可以为不同的设备选择不同的图像。

Documentation

文档

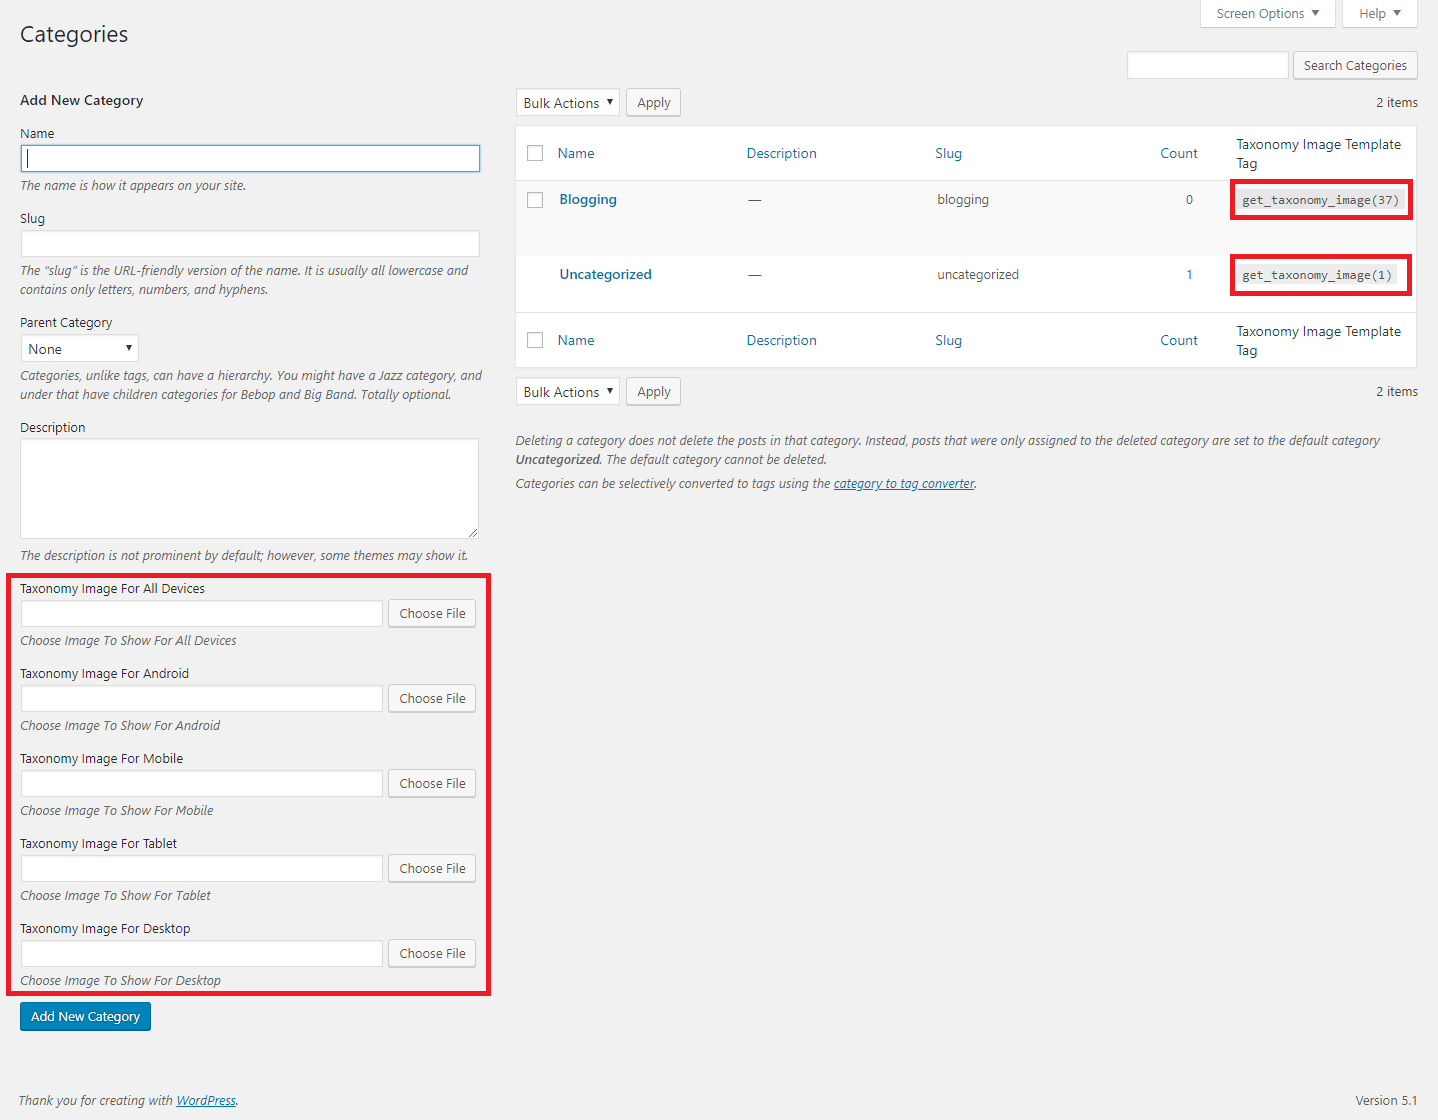
$taxonomy_img = get_taxonomy_image( int $term_id = get_queried_object()->term_id , boolean $return_img_tag = false , array $class = array() );

$ taxonomy_img = get_taxonomy_image(int $ term_id = get_queried_object()-> term_id,布尔$ return_img_tag = false,数组$ class = array());

get taxonomy image url if $return_html = true then return tag

如果$ return_html = true,则获取分类图像网址,然后返回标记
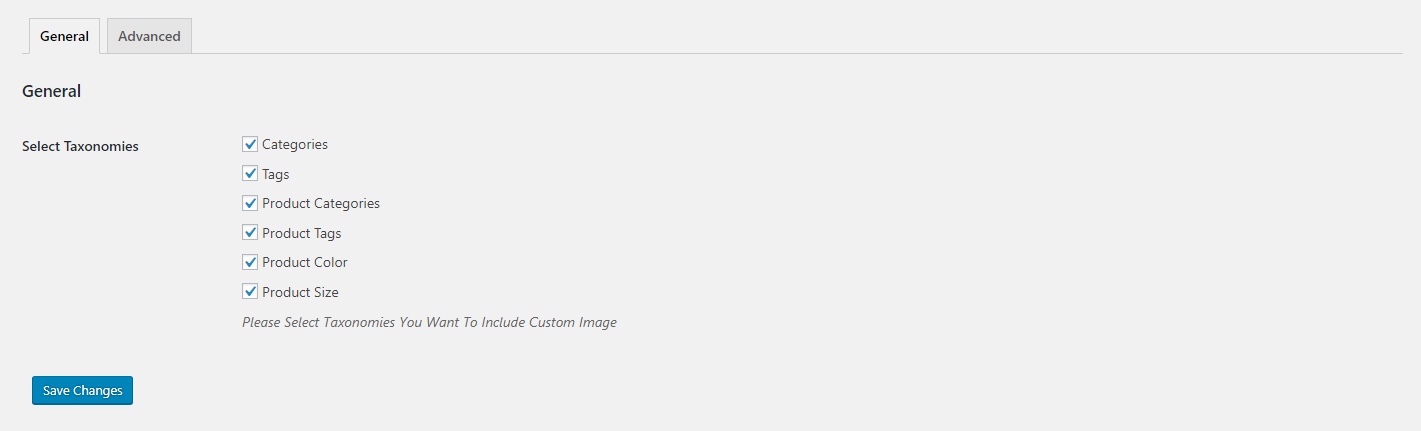
Parameters

参数

$term_id

$ term_id

(int) (Required) Taxonomy ID of the term.

(int)(必填)术语的分类ID。

$return_img_tag

$ return_img_tag

(boolean) (Optional) Formatted Image with tag for the field during output.

(布尔值)(可选)输出期间带有字段标签的格式化图像。

$class

$ class

(array) (Optional) Array of image classes ex: array('class1','class2',...) but $return_img_tag should be true to add image class.

(数组)(可选)图像类的数组,例如:array('class1','class2',...),但$ return_img_tag应该为true以添加图像类。

echo $taxonomy_img;

echo $ taxonomy_img;

// category / taxonomy image url

//类别/分类图片网址

where $term_id is ‘category / term id’

其中$ term_id是“类别/术语ID”

Features

功能

    • Option To Enable Custom Image Upload for different taxonomies
    • 启用针对不同分类法的自定义图像上传的选项

    • Option To Enable Custom Image Upload for different devices
    • 为不同设备启用自定义图片上传的选项

    • Very simple to use & WP Default Media Uploaded to upload image
    • 非常简单易用,并且已上传WP默认媒体以上传图片

    • Built-in Template Tag to use in your theme template
    • 用于主题模板的内置模板标签

安装步骤

    1. Go to WordPress plugin page
    2. 转到WordPress插件页面

    3. Click Add New & Upload Plugin
    4. 点击添加新的和上传的插件

    5. Drag / Click upload the plugin zip file
    6. 拖动/单击上传插件zip文件

    7. The resulting installation screen will list the installation as successful or note any problems during the install.

    8. 出现的安装屏幕将列出安装成功或在安装过程中记录任何问题。

      If successful, click Activate Plugin to activate it, or Return to Plugin Installer for further actions.

    9. 如果成功,请单击“激活插件”以将其激活,或单击“返回插件安装程序”以执行进一步的操作。

    10. Go to your Dashboard ->Settings -> Advanced Category & Taxonomy Image.
    11. 转到仪表板->设置->高级类别和分类图像。

    12. There You Will Find Fields To Enable Taxonomy & Device Filters.
    13. 您将在其中找到用于启用分类法和设备过滤器的字段。

    14. After Enabling Go To Your Taxonomy Add/Edit Page To Upload Image
    15. 启用后,转到分类法添加/编辑页面以上传图像

下载地址

https://downloads.wordpress.org/plugin/advanced-category-and-custom-taxonomy-image.zip

https://downloads.wordpress.org/plugin/advanced-category-and-custom-taxonomy-image.zip

-EOF-

AI助手支持GPT4.0