AI助手支持GPT4.0
Configure SMTP mailing in WordPress, including support for sending e-mail via SSL/TLS (such as GMail).
在WordPress中配置SMTP邮件,包括支持通过SSL / TLS(例如GMail)发送电子邮件。
This plugin is the renamed, rewritten, and updated version of the wpPHPMailer plugin.
此插件是wpPHPMailer插件的重命名,重写和更新的版本。
Use this plugin to customize the SMTP mailing system used by default by WordPress to handle outgoing e-mails.
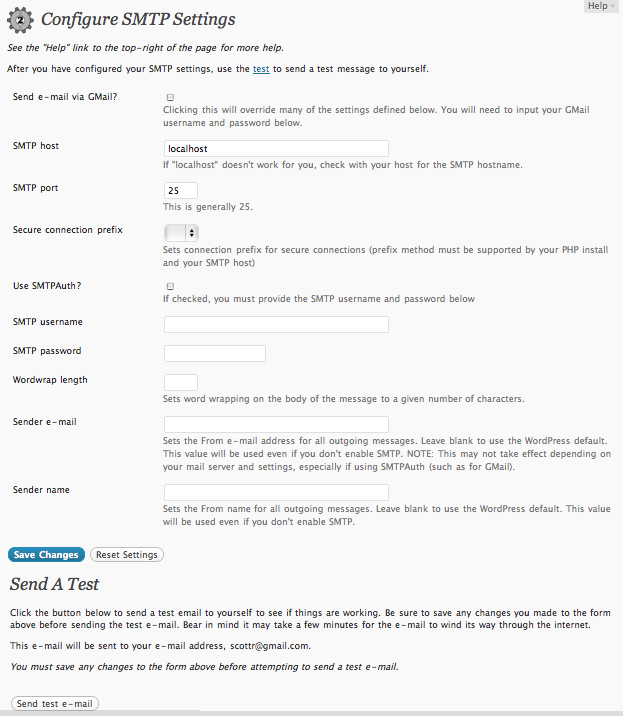
使用此插件可自定义WordPress默认使用的SMTP邮件系统,以处理外发电子邮件。It offers you the ability to specify:它使您能够指定:SMTP host name SMTP主机名SMTP port number SMTP端口号If SMTPAuth (authentication) should be used.如果应使用SMTPAuth(身份验证)。SMTP username SMTP用户名SMTP password SMTP密码If the SMTP connection needs to occur over ssl or tls如果需要通过ssl或tls进行SMTP连接In addition, you can instead indicate that you wish to use GMail to handle outgoing e-mail, in which case the above settings are automatically configured to values appropriate for GMail, though you'll need to specify your GMail e-mail此外,您可以指示您希望使用GMail处理外发电子邮件,在这种情况下,尽管您需要指定GMail电子邮件,但上述设置会自动配置为适用于GMail的值。 (including the “@gmail.com”) and password.(包括“ @ gmail.com”)和密码。Regardless of whether SMTP is enabled, the plugin provides you the ability to define the name and e-mail of the ‘From:’ field for all outgoing e-mails.无论是否启用SMTP,该插件都使您能够为所有外发电子邮件定义“发件人:”字段的名称和电子邮件。A simple test button is also available that allows you to send a test e-mail to yourself to check if sending e-mail has been properly configured for your blog.还提供了一个简单的测试按钮,可让您向自己发送测试电子邮件,以检查是否已为您的博客正确配置了发送电子邮件。Links: Plugin Homepage |链接:插件主页 | Author Homepage作者主页
It offers you the ability to specify:
它使您能够指定:
In addition, you can instead indicate that you wish to use GMail to handle outgoing e-mail, in which case the above settings are automatically configured to values appropriate for GMail, though you'll need to specify your GMail e-mail
此外,您可以指示您希望使用GMail处理外发电子邮件,在这种情况下,尽管您需要指定GMail电子邮件,但上述设置会自动配置为适用于GMail的值。
(including the “@gmail.com”) and password.
(包括“ @ gmail.com”)和密码。
Regardless of whether SMTP is enabled, the plugin provides you the ability to define the name and e-mail of the ‘From:’ field for all outgoing e-mails.
无论是否启用SMTP,该插件都使您能够为所有外发电子邮件定义“发件人:”字段的名称和电子邮件。
A simple test button is also available that allows you to send a test e-mail to yourself to check if sending e-mail has been properly configured for your blog.
还提供了一个简单的测试按钮,可让您向自己发送测试电子邮件,以检查是否已为您的博客正确配置了发送电子邮件。
Links: Plugin Homepage |
链接:插件主页 |
Author Homepage
作者主页
configure-smtp.zip
/wp-content/plugins/
在 / wp-content / plugins / 目录内解压缩 configure-smtp.zip (或通过内置的WordPress插件安装程序安装)Activate the plugin through the ‘Plugins’ admin menu in WordPress通过WordPress中的“插件”管理菜单激活插件Click the plugin's Settings link next to its Deactivate link (still on the Plugins page), or click on the Settings -> <单击插件的停用链接旁边的插件的 Settings 链接(仍在“插件”页面上),或单击 Settings -> < code>SMTP link, to go to the plugin's admin settings page.code> SMTP 链接,以转到插件的管理设置页面。 Optionally customize the settings (to configure it if the defaults aren’t valid for your situation).(可选)自定义设置(如果默认设置不适用于您的情况,则进行配置)。(optional) Use the built-in test to see if your blog can properly send out e-mails.(可选)使用内置测试来查看您的博客是否可以正确发送电子邮件。
/ wp-content / plugins / 目录内解压缩 configure-smtp.zip (或通过内置的WordPress插件安装程序安装)Activate the plugin through the ‘Plugins’ admin menu in WordPress通过WordPress中的“插件”管理菜单激活插件Click the plugin's Settings link next to its Deactivate link (still on the Plugins page), or click on the Settings -> <单击插件的停用链接旁边的插件的 Settings 链接(仍在“插件”页面上),或单击 Settings -> < code>SMTP link, to go to the plugin's admin settings page.code> SMTP 链接,以转到插件的管理设置页面。 Optionally customize the settings (to configure it if the defaults aren’t valid for your situation).(可选)自定义设置(如果默认设置不适用于您的情况,则进行配置)。(optional) Use the built-in test to see if your blog can properly send out e-mails.(可选)使用内置测试来查看您的博客是否可以正确发送电子邮件。
configure-smtp.zip (或通过内置的WordPress插件安装程序安装)Activate the plugin through the ‘Plugins’ admin menu in WordPress通过WordPress中的“插件”管理菜单激活插件Click the plugin's Settings link next to its Deactivate link (still on the Plugins page), or click on the Settings -> <单击插件的停用链接旁边的插件的 Settings 链接(仍在“插件”页面上),或单击 Settings -> < code>SMTP link, to go to the plugin's admin settings page.code> SMTP 链接,以转到插件的管理设置页面。 Optionally customize the settings (to configure it if the defaults aren’t valid for your situation).(可选)自定义设置(如果默认设置不适用于您的情况,则进行配置)。(optional) Use the built-in test to see if your blog can properly send out e-mails.(可选)使用内置测试来查看您的博客是否可以正确发送电子邮件。
Settings
Deactivate
停用链接旁边的插件的 Settings 链接(仍在“插件”页面上),或单击 Settings -> < code>SMTP link, to go to the plugin's admin settings page.code> SMTP 链接,以转到插件的管理设置页面。 Optionally customize the settings (to configure it if the defaults aren’t valid for your situation).
Settings 链接(仍在“插件”页面上),或单击 Settings -> < code>SMTP link, to go to the plugin's admin settings page.code> SMTP 链接,以转到插件的管理设置页面。 Optionally customize the settings (to configure it if the defaults aren’t valid for your situation).
Settings -> < code>SMTP
code>SMTP
code> SMTP 链接,以转到插件的管理设置页面。
Optionally customize the settings (to configure it if the defaults aren’t valid for your situation).
(可选)自定义设置(如果默认设置不适用于您的情况,则进行配置)。
原文出处:http://www.sanshu.cn/a/8277.html
群主管理都是支付大佬